1.Requirements

- Supports >Unity 5.1, Unity 2017.x, Unity 2018.x, Unity 2019.x and Unity 2020.x.
- Supports all platforms (PC, Mac, Linux, Android, IOS, WebGL, etc).
- Can be used in the Editor and/or at Runtime.
2.MCS in our Game and Demos
We make extensive use of Mesh Combine Studio in our game D.R.O.N.E. which we release step by step on Steam Early Access. We use MCS in our Arena Editor and pre-made Arenas. Without MCS in our Arena Editor, that build would run at 1-3 fps as we use very small meshes for our modular buildings which leads to massive draw calls, with MCS combining the draw calls get very low and buildings render super fast. Also MCS gives a huge performance boost on our pre-made arenas, where we are able to not only combine but also remove ~60-80% geometry from the rocks, and some arenas are build almost entirely out of rocks.
We have a free demo on Steam in case you’re interested to see what we’re working on:
D.R.O.N.E. The Game
The rocks we use are an Asset from the Asset Store called Rock & Builders 3 (from Manufactura K4):
Here is a demo build of an example Scene from a popular modular Asset called Dungeon Architect (available on the Asset Store). MCS boosts performance about 2170%! (from 37 to 805 fps) on my Nvidia 980TI compared to Unity’s batching:
MCS Dungeon Architect demo
Another demo with MCS used in Modular City Allay Pack (Available on the Asset Store):
MCS Modular City Allay pack demo
3.Getting Started
Simply drag and drop the MeshCombineStudio prefab into your Scene. You can use multiple MCS prefabs for different settings in the same Scene. If you use MCS in runtime, make sure you disable Unity’s static batching, otherwise Unity’s static batching will combine the meshes first and then MCS will again, which leads to double combining giving wrong results.
MCS is completely automated like Unity’s static batching and you don’t need to do tedious manual combining. MCS works with a clever cell based combining technique which is optimal for culling, z-sorting and LOD switching. What is unique about MCS is that it supports LOD meshes and that MCS is able to remove geometry that is never visible for the camera. E.g. triangles that are under a terrain/mesh, and/or backface triangles on background terrain or on a sideway scroller or top down game. With the MCS Caves & Overhangs extension you can remove triangles from overlapping meshes, e.g. overlapping rocks like we do with our arenas in our game. The requirement is that those meshes are closed. LODs are combined per cell and switching is done per cell. This gives even more performance and as a bonus gives less LOD popping artifacts.
If you have any scripts, colliders, audio sources, etc on your original GameObjects, these will still keep working as MCS only will disable the Mesh Renderers on the original GameObjects. In case of geometry removal you can choose to generate new mesh colliders, which will deactivate the original colliders. Combining can be easily reverted by either clicking the ‘Delete Combined’ button or you can click the button to switch between original state and combined state to compare performance. Keep in mind that the Unity Editor can give very inaccurate performance stats (not always) and it’s best to test and compare in a build. Sometimes with after combining with MCS, the Unity Editor can show slower performance than before combining, while in the build the performance is faster than before, so something to keep in mind.
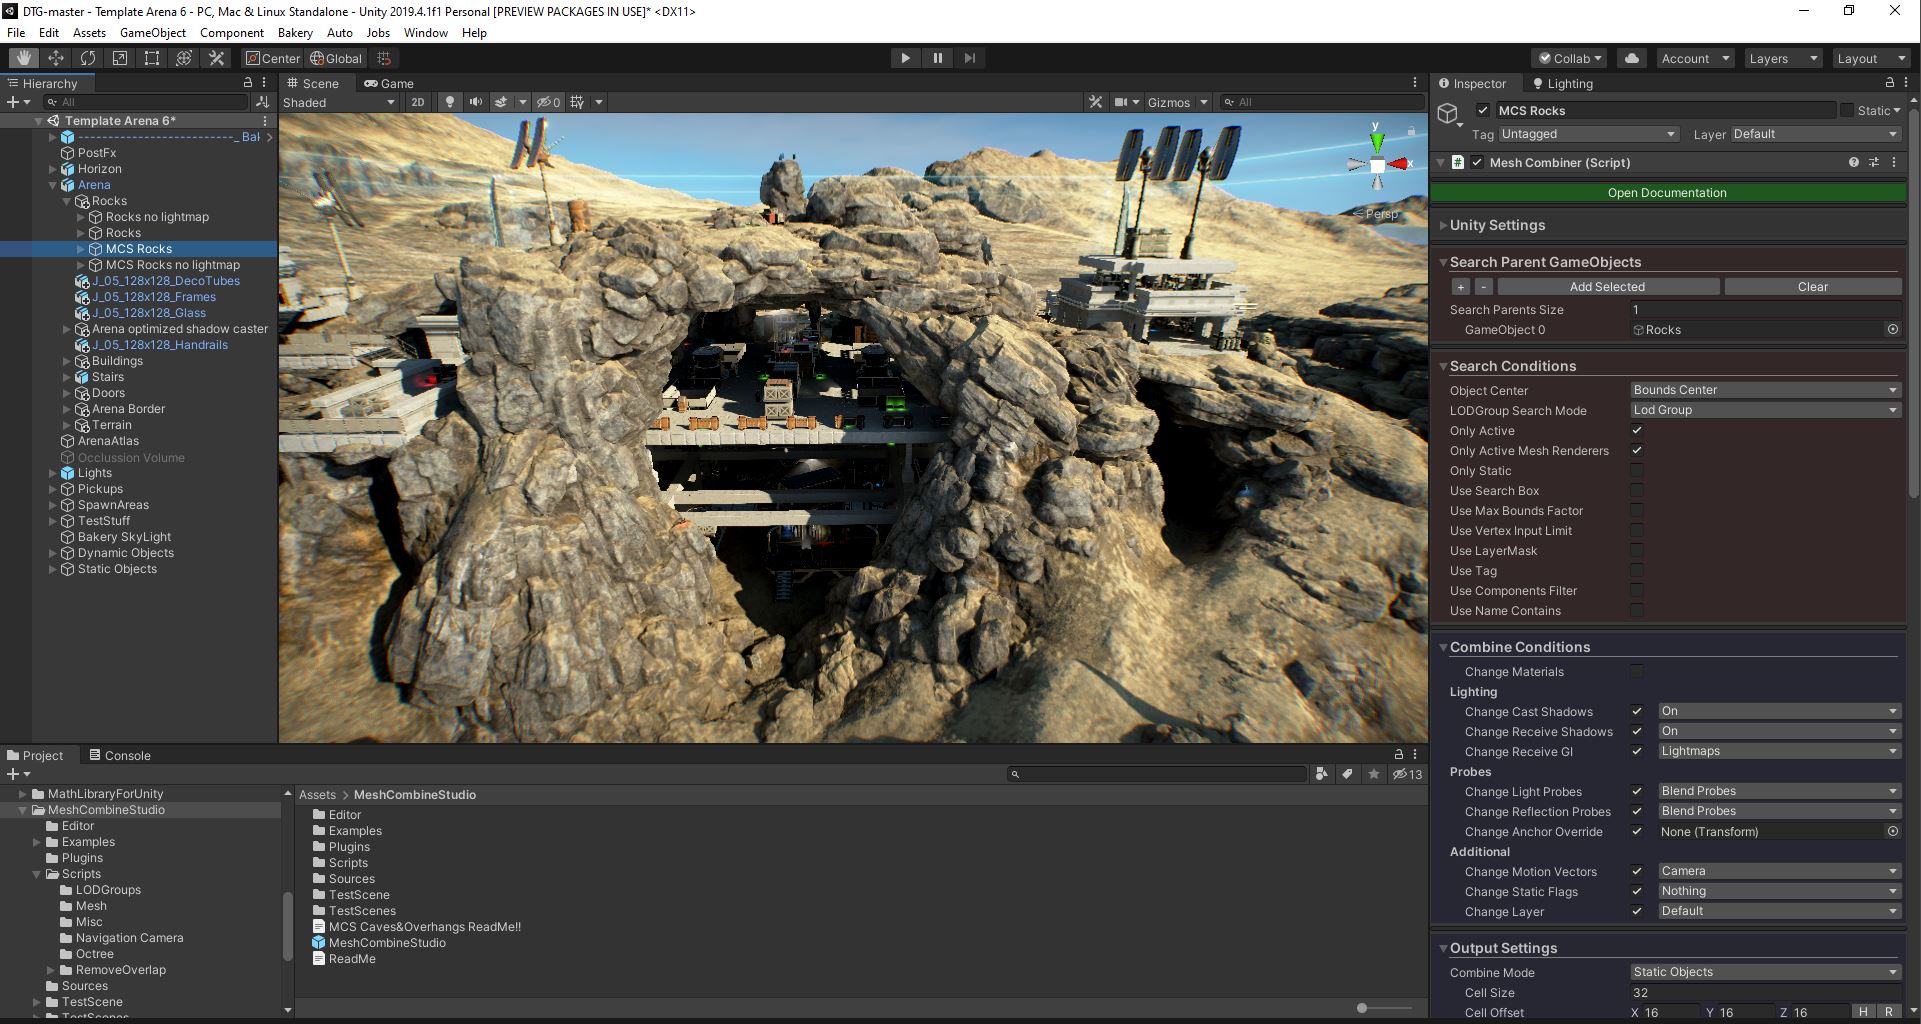
The MCS Inspector is divided into eight parts: Unity Settings, Search Conditions, Combine Conditions, Output Settings, Job Settings, Runtime Settings, Execute Buttons and Gizmos & Combine Stats.
Keep in mind that the default settings on the Mesh Combine Studio prefab are a good way to start. In the description below I enabled many options as they show more GUI if they are enabled, so I can explain them all.
3.1.Unity's Settings
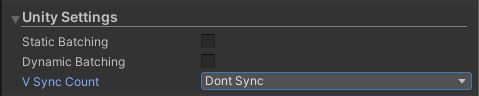
These are Unity settings from the Unity Menu (Player and Quality Settings) to quickly access them.
Static Batching
Enable/Disable Unity’s static batching (same setting as in Player Settings). More info on Unity’s batching can be found in the Unity Manual here.
Dynamic Batching
Enable/Disable Unity’s dynamic batching (same setting as in Player Settings).
V Sync Count
Enable/Disable Unity’s V Sync Count settings (same settings as in Quality Settings). Disable V Sync to measure true fps gain, otherwise Unity will cap to 60 fps.
3.2.Search Conditions
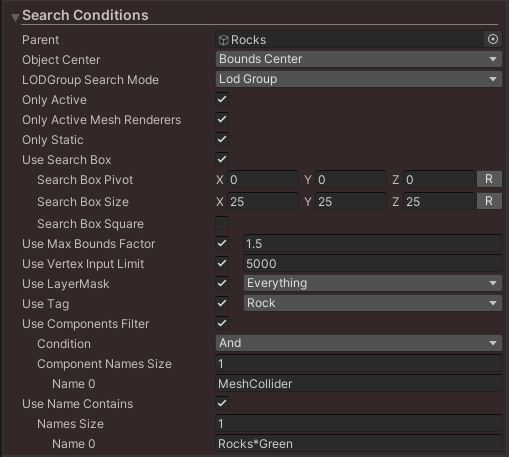
With the Search Conditions you can filter which GameObjects with meshes MCS will combine. GameObjects that don’t fit the criteria will be skipped.
Parent
The GameObject parent to search inside. Any GameObject child that meets the search conditions will be combined.
Object Center
Which position should be used to determine in which cell the mesh will be placed, the center of the mesh bounds in world space or the transform pivot.
Only Active
Only combine active GameObjects.
Only Active Mesh Renderers
Only combine GameObject with an active Mesh Renderer.
Only Static
Only combine GameObjects that have any static editor flag set. More info on the static editor flags can be found in the Unity Documentation here.
Use Search Box
Only combine meshes that are within the bounds of the search box.
Search Box Pivot/Size
The pivot position and the size of the search box.
Search box square
Makes the search box square.
Use Max Bounds Factor
Only include meshes which bounds are not bigger than x times the cell size (Cell Size can be chosen in Output Settings). This option limits that too big objects are included which would make cell bounds too big for optimal camera frustum culling.
User Vertex Input Limit
Only combine meshes that don’t exceed this vertex limit. MCS works best on small and medium meshes. Combining takes more memory than without, so having a good balance with only combining the necessary smaller meshes is important. I recommend to use a vertex input limit of around 5000. Unity’s static batching doesn’t have such filter option and it would all need to be selected manually to save memory, which can be tedious. For LOD Group meshes this option will be ignored, as combining the lower LOD levels is very beneficial.
Use LayerMask
Only combine GameObjects who’s Layer is in this selected LayerMask.
Use Tag
Only combine GameObjects with this selected Tag.
Use Components Filter
Only combine GameObjects with a certain component.
Condition And
Only include GameObjects that have all components.
Condition Or
Include GameObjects that have one of the components.
Condition Not
Exclude GameObjects that have one of these components.
Use Name Contains
Only combine GameObjects with a certain name (similar to windows explorer file search). E.g. can use Rocks*Green and will include all GameObjects that contain the word ‘Rocks’ and ‘Green’.
3.3.Combine Conditions
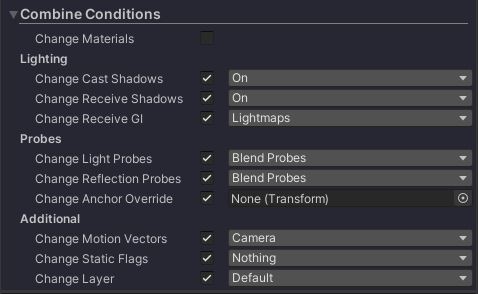
The Combine Conditions decide which meshes will be combined together into 1 combined mesh. If any ‘Change’ setting is disabled, MCS will combine the objects with that specific setting separately into 1 combined mesh. E.g. in the image ‘Change Materials’ is disabled which means MCS will combine objects with the same material into 1 combined mesh. So if the original objects have 3 materials, then it will result in 3 combined meshes. Enabling it, MCS will combine all meshes into 1 combined mesh with the output material you choose. E.g. you have meshes that need lightmap baking and meshes that don’t. With disabling ‘Change Static Flags’ MCS will automatically combine those 2 separately.
So with any ‘Change’ setting disabled MCS will take the original setting and separate combining based on that, and the combined meshes will have the original setting. With ‘Change’ setting enabled MCS will ignore the original setting and combine all with the output setting you choose. This way you get very fined grained control over what should be combined together or not. Without it you would need to use multiple MCS prefabs and sort the objects in different parents.
Combinging all meshes separately into 1 material for shadows
With all the ‘Change’ settings enabled including the ‘Same Material’ all meshes with different materials can be combined into 1 material (some meshes would still need a special material in case of e.g. a cut-out shader, this is often used on vegetation and billboards). Combining all materials into 1 can reduce even more the draw calls needed for shadow rendering, as shadow rendering can be quite expensive, especially when using multiple shadow cascades. For each shadow cascade Unity will redraw the geometry, this can be seen with increased draw calls in the Unity stats window. On top of that you can also enable the ‘Weld Vertices’ option in the ‘Output Settings’. This will remove vertices that share the same position. We are using this technique in our arenas to optimize performance even further.
So in order for this option to work you need 2 MCS prefabs:
On the first prefab combine the meshes normally with:
* ‘Change Cast Shadows’ toggle enabled and output ‘Off’.
* ‘Change Receive Shadows’ toggle enabled and output ‘On’.
On the second prefab combine the shadow meshes with:
* ‘Change Material’ toggle enabled and select a simple material with a shader that supports shadows (this can be the Unity standard shader).
* ‘Change Cast Shadows’ toggle enabled and output ‘Shadows Only’.
* ‘Change Receive Shadows’ toggle enabled and output ‘Off’.
3.4.Output Settings

Use Cells
Combine cell based, only disable cells for e.g. combining parts for dynamic objects.
Cell Size
The size of the cells in which meshes will be combined into one mesh. There’s a trade-off between cell size and camera frustum culling. The bigger the cell size the less draw calls you will get, but culling will be less efficient. Based on your Scene there’s an ideal cell size which gives best performance, it’s something that needs to be tested with multiple cell sizes preferably in a build.
Cell Offset
Offset position of the cells. Based on your Scene, using or not using a cell offset can give less cells. Less cells is always better as it will lead to lower draw calls.
Remove Overlapping Tris (This option is only available with the MCS Caves & Overhangs extension)
Removes triangles inside overlapping meshes. E.g. 2 rocks that overlap, both have triangles inside each other that are never visible, with this option MCS will remove these. Remove Overlapping Tris gives us ~60-80% geometry removal on the rocks in our arenas. Which obviously will render them ~3x faster. The requirement for the meshes that you want to remove the geometry from is that they need to be closed, so no holes in them. This also removes vertices/normals/tangents/uvs, etc to save memory.
Remove Same Position Triangles
This will remove triangles that share the same position while not being visible on the outside. E.g. the insides of snapped together cubes.
Overlap LayerMask
Put the meshes you want to remove insides from on the layer, but also meshes outside of the search parent can be included on the layer (and they don’t necessarily need to be closed). E.g. our marching cube terrain mesh we include in this layer as well as Remove Tris Below Surface only works on a heightmap based mesh (our older arenas use a heightmap based terrain). Meshes outside the search parent don’t necessarily need to be closed, like a heightmap terrain is not closed but will work. Important is that the collider backfaces shouldn’t be visible to the camera, if they are, removal doesn’t work correctly.
Free Layer 1 & 2
Select 2 layers that have no colliders on them. MCS detects inside geometry using mesh colliders and raycasts and needs 2 layers to isolate the detection from the rest of the colliders in your Scene.
Remove Tris Below Surface
Remove triangles that are below any surface (terrain and/or meshes). This works collider or camera based. This also removes vertices/normals/tangents/uvs, etc to save memory.
Surface Has No Colliders
If the surface has no colliders or inaccurate colliders you can use this option to use a camera instead. MCS will take a depth capture with a camera above the cell and will accurately remove triangles below the surface.
Surface Layer Mask
The layers on which the surface mesh/es are.
Raycast Height
This needs to be at least the maximum height of your surface. This is the height where the rays are cast from or where the camera takes the depth capture from.
Remove Backface Tris
Removes triangles that will never be visible for the camera if the camera stays within a certain box volume or is always facing a certain direction. E.g. if you have an inner area where the player cannot go beyond and outside of this area you placed objects (even big mountain meshes) you can remove the back part of those meshes as the player will never see them. This can also work for a top down game or side scroller game where the player is never able to see a certain angle. This also removes vertices/normals/tangents/uvs, etc to save memory.
Backface Mode
Box based: Case where Camera stays within the box volume.
Direction based: Case where Camera is orthogonal and doesn’t rotate.
Center/Size
The center and size of the box volume.
Two Sided Shadows
When using shadows this probably needs to be enabled to keep correct shadows, otherwise they will be cut-out because the backface triangles of the meshes are missing. Double sided shadows are more expensive as backface triangles that normally will be skipped by the GPU will cast shadows as well. That’s why if you need shadows it’s important to not include meshes that don’t need backfaces removed. It’s better to combine those meshes with another MCS prefab without backface removal and with normal shadow mode.
Weld Vertices
Only use this option if you combine the meshes separately for shadows. This will remove vertices that share the same position. It can slightly change the shadows but likely the difference is so small it isn’t noticeable.
Snap Vertices
This will remove a vertex if it’s close to another vertex. The distance can be chosen with ‘Snap Size’, a too big snap size can change the shadows too much.
Include Normals
The normals will be included with the mesh with gives more accurate shadows and will react to shadow bias settings. In some cases normals might not be needed.
Add Mesh Colliders
Adds mesh colliders to the combined Meshes and disabled colliders on the original objects. Only use this options if you don’t have any colliders on the original GameObjects or if you remove geometry. It’s much faster to use primitive colliders on the original GameObjects if it’s possible.
Use Range
Only add mesh colliders that are within a box. E.g. if you have a limited area and you want the objects to react to bullets they need collider on them, but far away objects wouldn’t.
Center/Size
The center and size of the box.
Make Meshes Unreadable
Removes the copy of the mesh arrays from CPU memory, which saves CPU memory. Only disable this option if you need to read from the meshes.
Use Vertex Output Limit
Limit the maximum vertices for combined meshes. This can be used in runtime if you need to keep frame-rate high, otherwise don’t use this option as it will lead to more draw calls.
Copy Baked Lighting
The Lighting of the original meshes will be copied to the combined meshes. Copy baked lighting can result in more combined meshes (more draw calls than with rebaking) as the source objects need to have the same lightmap index. The advantage is that the Scene file size doesn’t increase when used with ‘Combine In Runtime’.
Rebake Lighting
Rebake the lighting on the combines meshes. The lightmap uv’s can be copied but in case of geometry removal it’s best to regenerate them as this can save a lot of lightmap texture space.
Scale in Lightmap
The scale of the combined meshes in the Lightmap, default value is 1 and a smaller value will create Lightmaps with less file size.
3.5.Job Settings
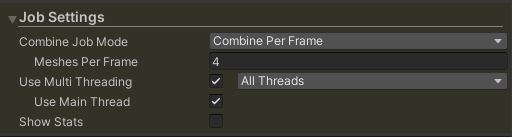
These are the settings for the multi-threaded combine job manager. There’s one global job manager that handles all combine jobs, and there can be many MeshCombineStudio prefabs which all send the jobs to the job manager. The job manager is designed to have as low memory and garbage allocation as possible. Each mesh type is only cached once and new combined mesh arrays are reused with pooling. I made a special plugin to have mesh arrays assigning without creating garbage by re-using the arrays pool.
Combine Job Mode
Combine At Once: Use this options if you quickly want to combine all meshes as fast as possible e.g. in the Unity Editor or in Runtime after loading a level.
Combine Per Frame: Choose the amount of meshes that will be combined per frame to keep FPS up. This can be used for any Runtime editing like players creating levels, etc or when removing overlapping geometry in the Unity Editor which can take some time.
Use Multi Threading (Optional)
The combine part itself can be done on multiple threads. This can speed up the combining linearly with the amount of cores/threads available.
Use Main Thread
This option can be disabled when using multi threading. This will keep FPS higher on the main thread. Still the assigning of the meshes can only be done on the main thread, since it needs to use the Unity Mesh API, which doesn’t allow calling from another thread. But the more compute intense combining itself can be done on the other threads.
Show Stats
Show the stats of the Job Manager. Amount of meshes cached, amount of pending jobs, etc.
3.6.Runtime

Combine in Runtime
Combine meshes that meet the Search Conditions in runtime.
Combine on Start
Combine meshes automatically on Start or call the `meshCombiner.CombineAll()` method on the MeshCombiner script yourself from another script.
Original Mesh Renderers
What needs to be done with the original MeshRenders? (Disable or Delete).
Original LODGroups
What needs to be done with the orginal LOD Groups? (Disable or Delete).
Use Combine swap key
Switch between MCS and original GameObjects to see the performance difference.
3.7.Execute Buttons
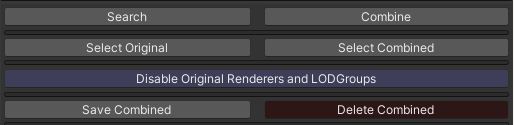
Search
Search and report the found GameObjects (based on Search Conditions) for combing.
Combine
Combine the GameObjects into new combined meshes (this doesn’t require to click on ‘Search’ button first). The new GameObjects will be spawned as children of the MeshCombineStudio GameObject.
Select Original
Multi select all the original GameObjects that were found with the ‘Search’ button. This can be useful to change a setting on e.g. the Mesh Renderer component.
Select Combined
Multi select the combined GameObjects that are created after combining. This can be useful to change a setting on e.g. the Mesh Renderer component.
Disable/Enable Original Renderers and LodGroups
Switches between rendering the original and combined Mesh Renderers.
Save Combined
Saves the combined meshes to a folder in the project so they can be used in other Scenes.
Delete Combined
Deletes the combined GameObjects, use this to reset to the original state. MCS will automatically re-enable the Mesh Renderers/LODGroups/Colliders on the original meshes.
3.8.Gizmos and Stats
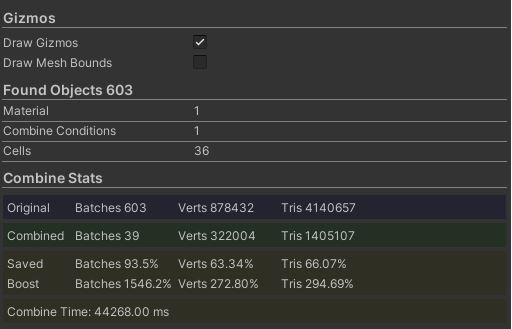
Draw Gizmos
This will show the gizmos for the cells, search box and add mesh collider box. The mesh bounds will show the bounds of the original or the combined meshes.
Found Objects
The number of GameObjects with meshes and the amount of materials/combine conditions and cells they use.
Found LOD Groups
The number of LOD Groups and meshes per lod level found.
Combine Stats
MCS reports how it improved the Batches (draw calls) and the vertices/triangles in case of geometry removal.
4.Combining Caveats
Increased vertex and triangle count after combining in the Unity stats window
The vertex and triangle count in the ‘Combine Stats’ should never be higher than the original. In the Unity Stats window it can be higher, but shouldn’t be too high compared to the original:
- The bigger the cell size the lower the draw calls but frustum culling gets less efficient because of mesh bounds getting bigger (which increases vertices and triangle count as more triangles get outside of screen bounds. This is quite fast on the GPU as pixel shader will be skipped for that triangle, but vertices still will be processed, which can have some overhead). There’s a sweet spot for best cell size depending on the situation, best is to check different cell sizes to see which works best. It’s best to experiment with a total cell count between 50-300 which gives the best performance.
- Forward Rendering. For each point/spot light each mesh in their light range will be redrawn, same applies here regarding cell size. Deferred Rendering doesn’t have this issue because all lights are rendered in screen-space.
- Directional Light shadows, same applies here regarding cell size.
- Point/Spot Light shadows, same applies here as the forward rendering, only the shadows in range need the meshes to be redrawn, also same applies here regarding cell size.
Combining in HDRP
The Unity HDRP scriptable render pipeline uses a depth-prepass which draws all the opaque meshes with a very cheap shader first to avoid overdraw. This will result in double draw calls. Therefor combining in HDRP is important to reduce these draw calls.