TerrainComposer 2 Documentation
1.Current Requirements

- Requires Unity >5.1, Unity 2017.x, Unity 2018.x, Unity 2019.x .
- For the Unity Mac Editor, TC2 needs Metal for it to work, which Unity is working on in Unity5.6. ‘Metal Editor’ can be enabled in Unity Menu -> Edit -> Project Settings -> Player Settings -> Other Settings. TC2 created terrains can be used in iOS and Mac builds.
- Works on Android build mode in the Unity Editor. For it to work need to disable Graphics Emulation in Unity Menu -> Edit -> Graphics Emulation -> No Emulation.
2.Stamp pack
Download the TC2 stamp pack from Dropbox or Mega. TerrainComposer2 includes a free stamp pack made by me with high resolution 4k stamps. The main TC2 package does not contain this because I want the main TC2 package to be small so it’s easy to update to the Asset Store and doesn’t require a new import of TC2 when new stamps are made. I will add many more stamps later.
3.Quick Start
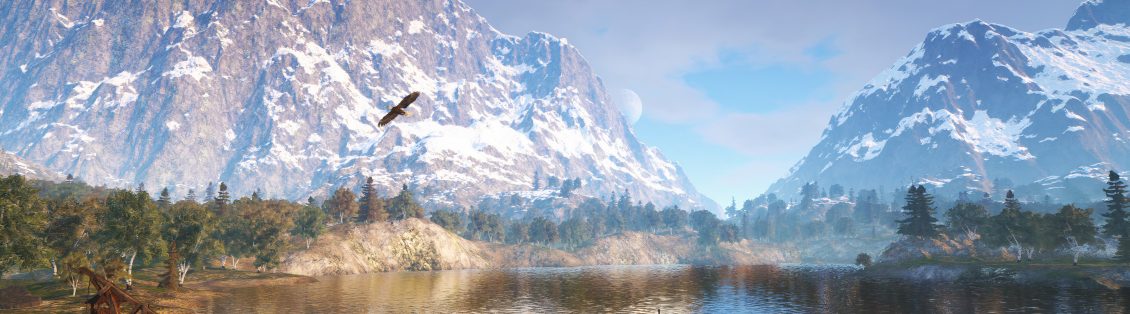
3.1.Example Scene
TerrainComposer includes an example scene and 5 example projects that can be loaded from the menu of TC2 window. The example Scene is located in the folder TerrainComposer2 -> Examples. Also another 5 procedural examples are included, these are made out of procedural noises and mathematical shapes. They are animated on the height layers. The animation script can be disabled on the height layers (green nodes on the left). In the top right corner of the TC2 window next to ‘Seed’ there are one letter buttons which are a shortcut for the bigger output buttons (Height, Splat, Color), these buttons work exactly the same. You can download and import the TC2 example pack (which is needed for the MountainVillage example scene) from Dropbox or Mega, which includes the free Speed Tree pack from the Asset Store.
All the noise nodes in TC2 have a seed (3d noises that animate on seed) that can also be adjusted globally with the ‘Seed’ field in the top right corner of the TC2 window. Changing the ‘Seed’ will give you a different landscape.
3.2.Starting from scratch
The TerrainComposer 2 window can be opened in:
‘Unity Menu -> Window -> Power Of Nature Software -> TerrainComposer2’.
This is the tutorial how to make a terrain from scratch. This example is included in TC2 and can be opened in TC window top left menu -> File -> Open -> Tutorial1
The stamps are not included in the main package (to keep it small) and can be downloaded from section 2.
After opening the TC2 window a TerrainComposer2 GameObject with children will be created and this is a TC2 project. This GameObject can be deleted if you don’t need any runtime generation, if you don’t want to loose all the nodes make sure you save it first in TC2’s menu. A TC2 project is saved with your Scene. You can save/load it manually in the TC2 window menu -> File -> Open/Save. There’s a handy GameObject called ‘MeasureTool’ where you can measure the splat and grass density on the terrain.
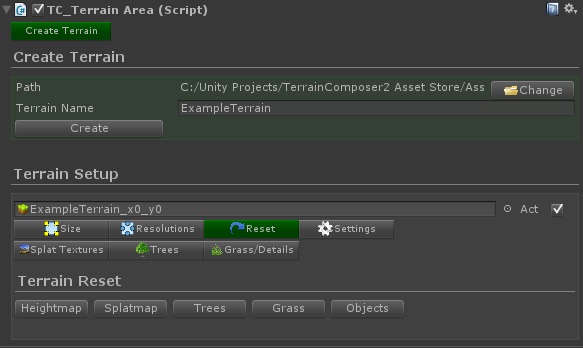
Create a Terrain
If you start with a non TC2 Scene, after opening the TC2 window you first need to create a terrain. The Terrain Area GameObject will be automatically selected and it has the terrain as a child and in its Inspector window you need to choose a project path to save your terrain, give it a name and click the ‘Create’ button. Make sure the path is within your Unity project. At the ‘Terrain Setup’ part you can easily setup your Unity terrain, this is a quicker way then editing the Unity terrain with its terrain script by itself. This will also work with multi terrain tiles (included in Asset Store version). The splat and grass textures in their tabs are already assigned and you can put your own textures there. Trees still need to be assigned as they are not included in the main TC2 package, as I want to have TC2 package as small as possible to make it easy to update on the Asset Store. Each output can be reset in the ‘Reset’ tab. The splat, tree and grass tab will later be put into the TC2 window with automatic setup as well other tabs. But for now this easy to setup inspector script can be used.
3.3.TC2 Window
You can get a quick grasp on how TC2 works by analyzing the preview images on the nodes. The easy thing to remember is that each output (Height/Splat/Color/Tree, etc) works in the same way. So once you understand one output it’s easy to understand them all. And you can move Layers and Layer Groups from one output to the other.
TC2 generates on the GPU and therefore terrain resolutions can be at 512. Splat- and Colormap can be much higher like 1-2k. During the workflow you can put the terrain resolution higher and see the result in high detail. However real-time editing is not really responsive due to the delay. The resolutions can be put lower again to make it real-time editable.
A quick overview of the TerrainComposer2 node window:
 TerrainComposer2 has a Hierarchy of GameObjects in the Hierarchy window (hidden), actually each node (the red/green/blue/yellow all of them) is an actual GameObject with its Transform that is used for moving, rotating and scaling. Each Node GameObject has a TC2 script attached which contains the node information.
The Nodes are parented in such a way that everything reacts powerfully to moving/rotating/scaling which correctly scales the children. Hold control to lock the transform of the children so a pivot can be changed. A node has more lock options in inspector. Control + L key is a short cut to enable/disable transform locking. You can attach your own scripts to a node. With scripts you can change the parameters of a node or you can animate the transform of a node to have animating terrain. There is a simple script called TC_AnimateNode that you can attach to a node to animate it.
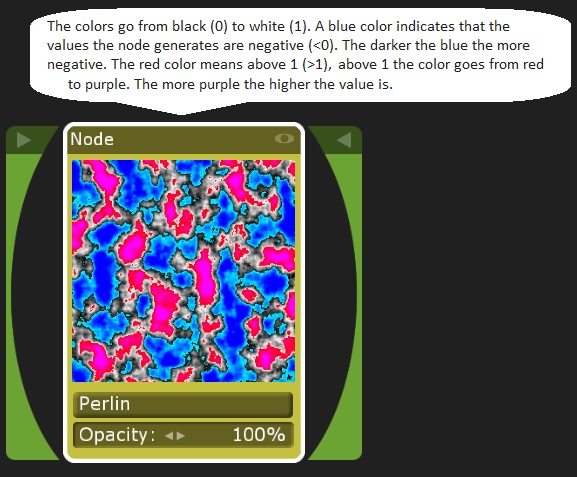
For the Heightmap output the colors are related to the terrain height. So if a terrain is 500 meter high, above 500 the color will turn red. The base level is always on 0 so below that will be the blue color. For the other outputs the display values are between 0 – 1. For example if you use a node to read from the terrain height there, it might not be the same visual strength as the one in the Height output, this is because in Height output it is visualized in terrain height local space while in the other outputs the height is converted into TC2 world space. So whatever changes you make to a terrain size doesn’t matter. TC2 will always generate the same as generating is based on world space. With this feature you can easily expand or shrink your world.
3.4.Presets
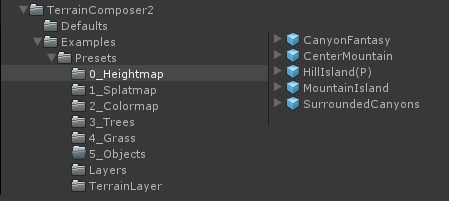
Since each Node and Node Group is an actual GameObject, they can be easily drag and dropped into the Project window to save as a prefab. This has still a small issue that it doesn’t always work, you first need to drag a GameObject from the Hierarchy window on top of the Project window, don’t drop it, and somehow Unity will then accept the drop from the TC2 window (will be fixed). Making presets can be done on any level. I already made some presets for you to explore. The presets are located in the folder TerrainComposer2 -> Examples -> Presets. The 0_Heightmap, 1_Splatmap, etc folders contain Layer Groups. These prefabs can be dropped anywhere within its output and even in other outputs if you want to use the nodes there. E.g. a Splat Layer Group can be dropped in a Tree Output. With drag and drop you can re-arrange all nodes and with holding the alt button they will duplicate. If the project is empty the Layer and Layer Group presets can be dropped on the ‘Result’ node in the Main Layer Group. The presets can be mixed with each other by using masks, etc to create a unique looking terrain. The Example Scene is actually a mix from presets. A Terrain Layer is a layer that holds all the Main Layer Groups, and it is the actual GameObject you will save/open with the TC2 menu. Later this will be a node by itself that will act like a Layer and can be grouped in a Terrain Layer Group. So you will be able to make complete terrain presets and mix those together into 1 terrain.
3.5.Stamps
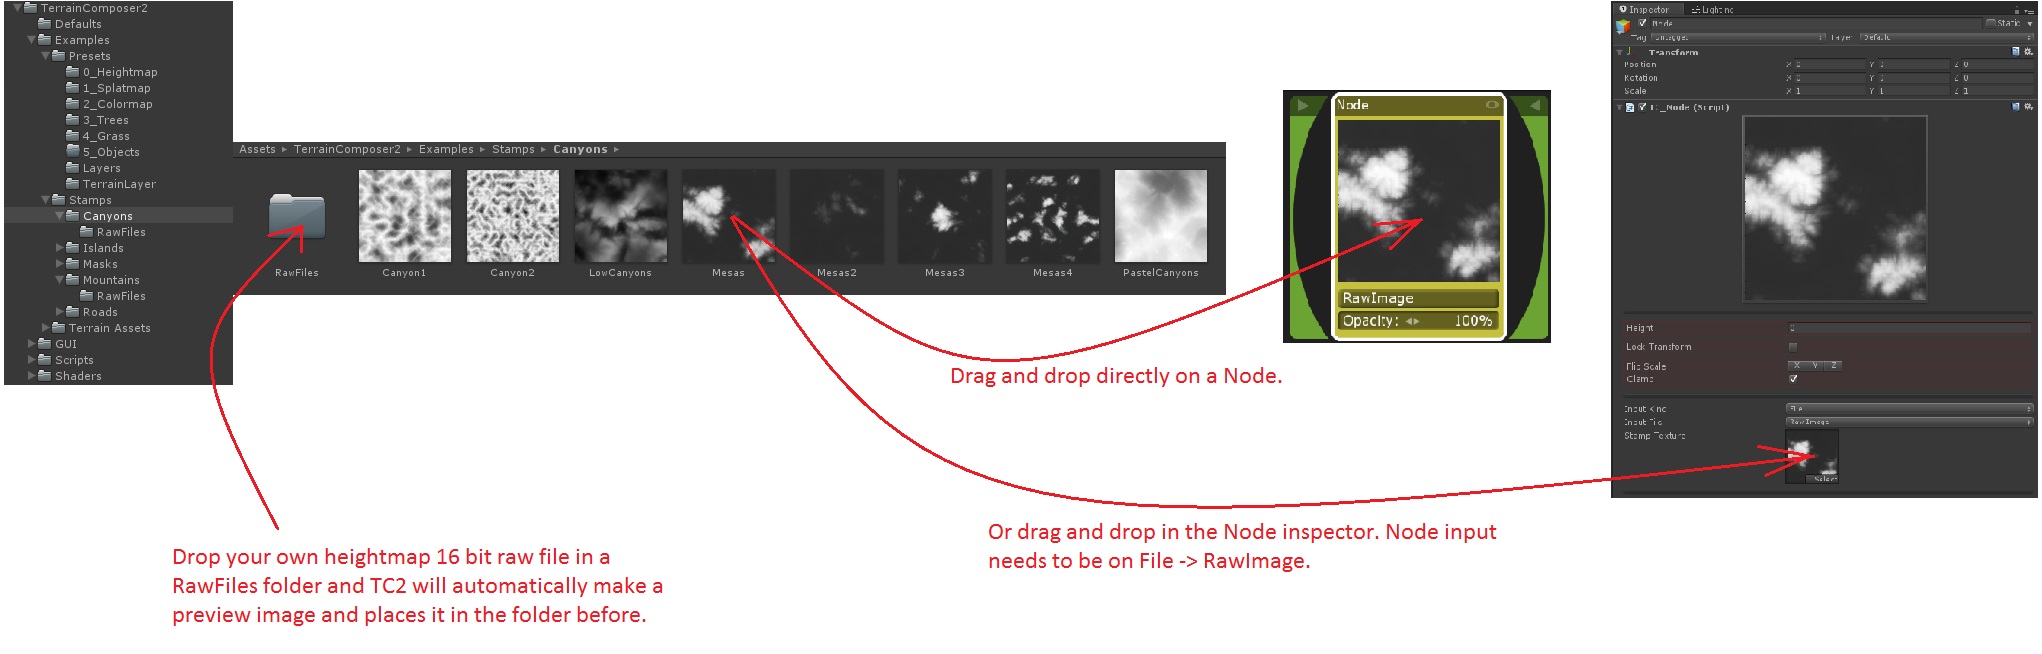
The stamps are not included in the main package (to keep it small) and can be from Dropbox or Mega. The example package contains high resolution 4k stamps. After downloading and importing the package the stamps are located in the folder -> TerrainComposer2/Examples/Stamps. The actual stamp data is in the RawFiles folder and each stamp is a 16 bit raw grey scale image. In the folder before there are preview image of the stamp, these you can drag and drop on a node, and TC2 will automatically load the stamp and puts the node into stamp mode. For stamp mode a node inputs is on -> File -> RawImage. You can also drop the stamp preview image into the ‘Stamp Texture’ slot in the Inspector of a node.
You can use your own stamps by simply dropping your 16 bit raw grey scale image into any folder with the ‘RawFiles’ folder name. This triggers the TC2 raw import script, and TC2 will make a preview image which is placed in the folder before, this preview image you can drag and drop on a node. This can be any resolution as long as it is square, the limit is you GPU hardware and even 8k – 16k stamps are possible (we are talking about a 128mb and 512mb stamp). For like 32k (2gb) it might be possible and I will look into this later.
How to import and export Raw files from Photoshop

3.6.WorldComposer and TC2
WorlComposer heightmaps are 16 bit raw images which are TC2 stamp format. So you can easily use WorldComposer heightmaps with TC2. See the Stamp section on how to convert a raw file to a stamp.
3.7.Manual Object Placement
With manual object placement you can use regular meshes to influence the outputs. It can be used in all the outputs. To give an idea of what you can do:
The demonstration video still has the prototype GUI.
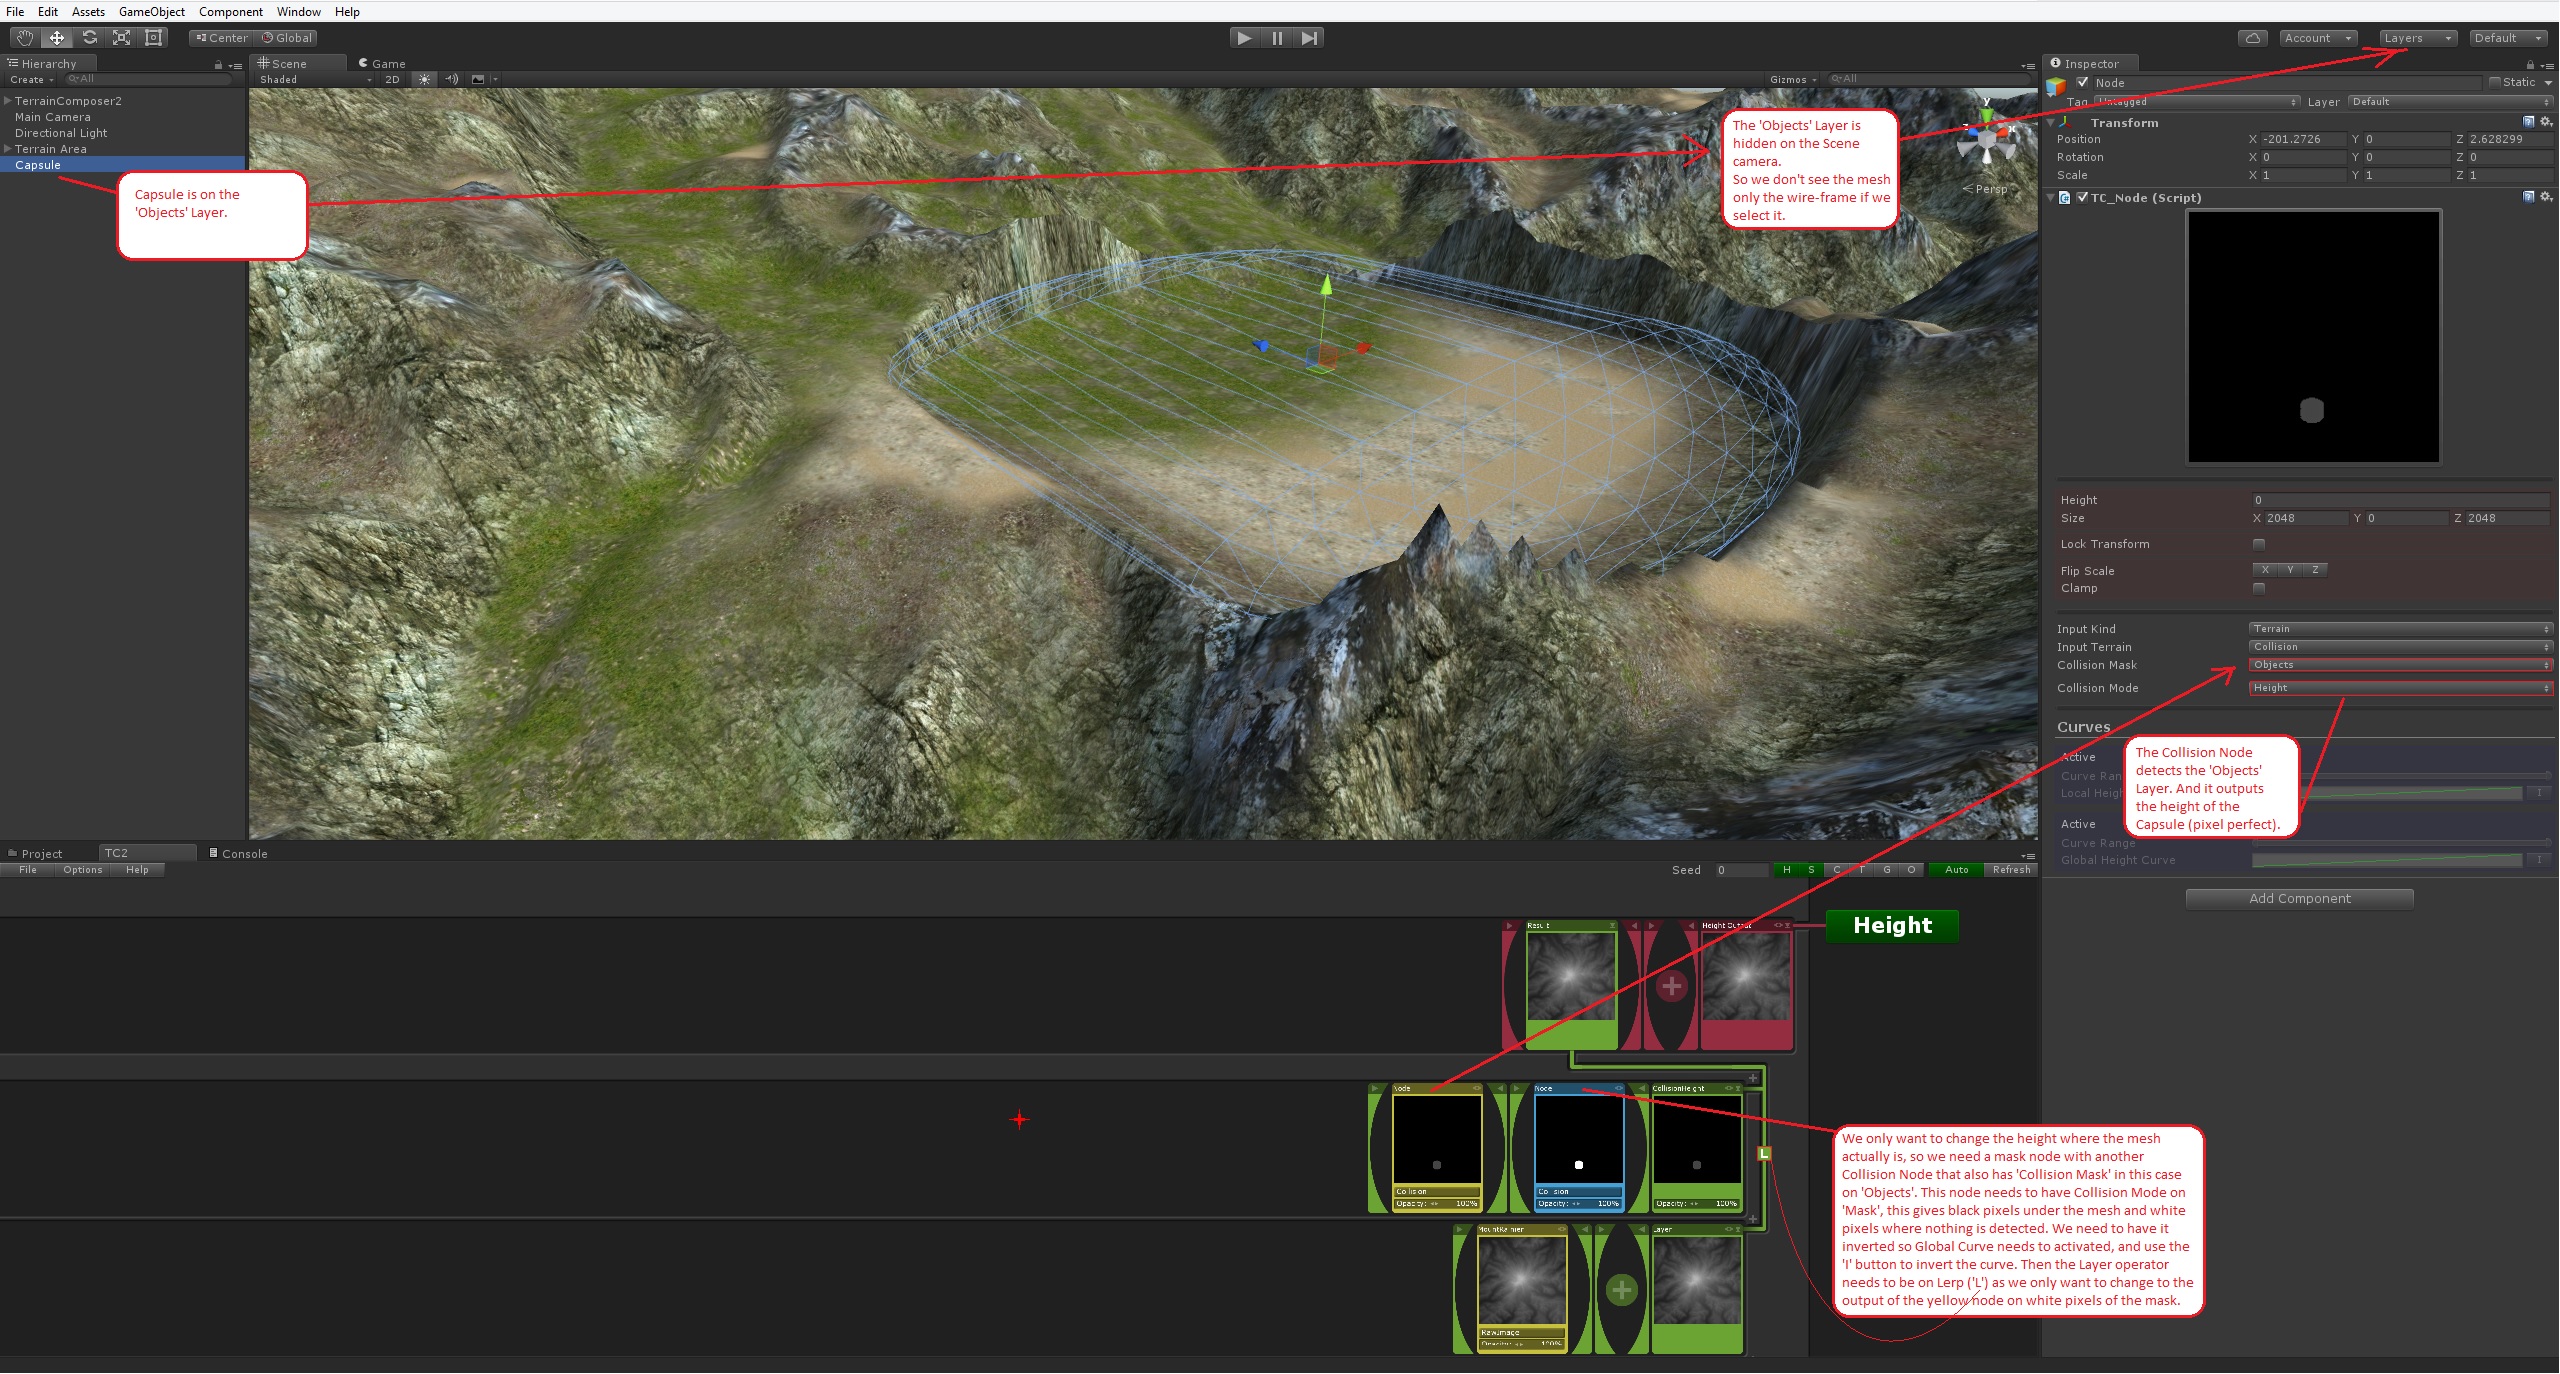
It can be used for many purposes. E.g. you can use it to adjust the terrain height to your mesh, or place particular splat textures under your mesh, or exclude objects/vegetation being placed under your mesh.
To detect a mesh you need to use a node with input on ‘Collision’ (Input -> Terrain -> Collision). You can use Unity’s Layer system the same way to detect them in the Collision Node as you do normally with Culling Mask in a Camera. To be able for TC2 to automatically generate when you change the transform (move/rotate/scale) of your mesh GameObject you need to attach the ‘TC_AutoGenerate’ script to it (this can be done in Inspector with the ‘Add Component’ button).
A preset for adjusting the terrain height to the height of a mesh is included. It’s located in the folder TerrainComposer2 -> Examples -> Presets -> Layers -> CollisionHeight. Just drag and drop the layer on the Result Group node to place it at the top. This preset is used in the screenshot:
4.How it works
Terrain Layer
In Quick Start there’s shortly explained how the hierarchy of TC2 LayerGroups, Layers, Nodes, etc. It starts with a ‘Terrain Layer’ which has 6 Layer Groups:
- ‘Height’ output for creating heightmaps.
- ‘Splat’ output for creating splatmaps.
- ‘Color’ output for creating colormaps.
- ‘Tree’ output for spawning trees as Unity terrain trees.
- ‘Grass’ output for spawning grass as Unity terrain grass.
- ‘Object’ output for spawning any kind of GameObject or Prefab.
Layer Group
Each main output is a ‘Layer Group’. And a Layer Group contains a Result node and a Mask Group Node (hidden if children are empty). With the Layer Group are ‘Layers’ and each Layer can be blended with each other based on the method (add/subtract/min/max, etc). A Layer Group can also contain Layer Groups, these can also contain Layer Groups, and this can go on in unlimited levels.
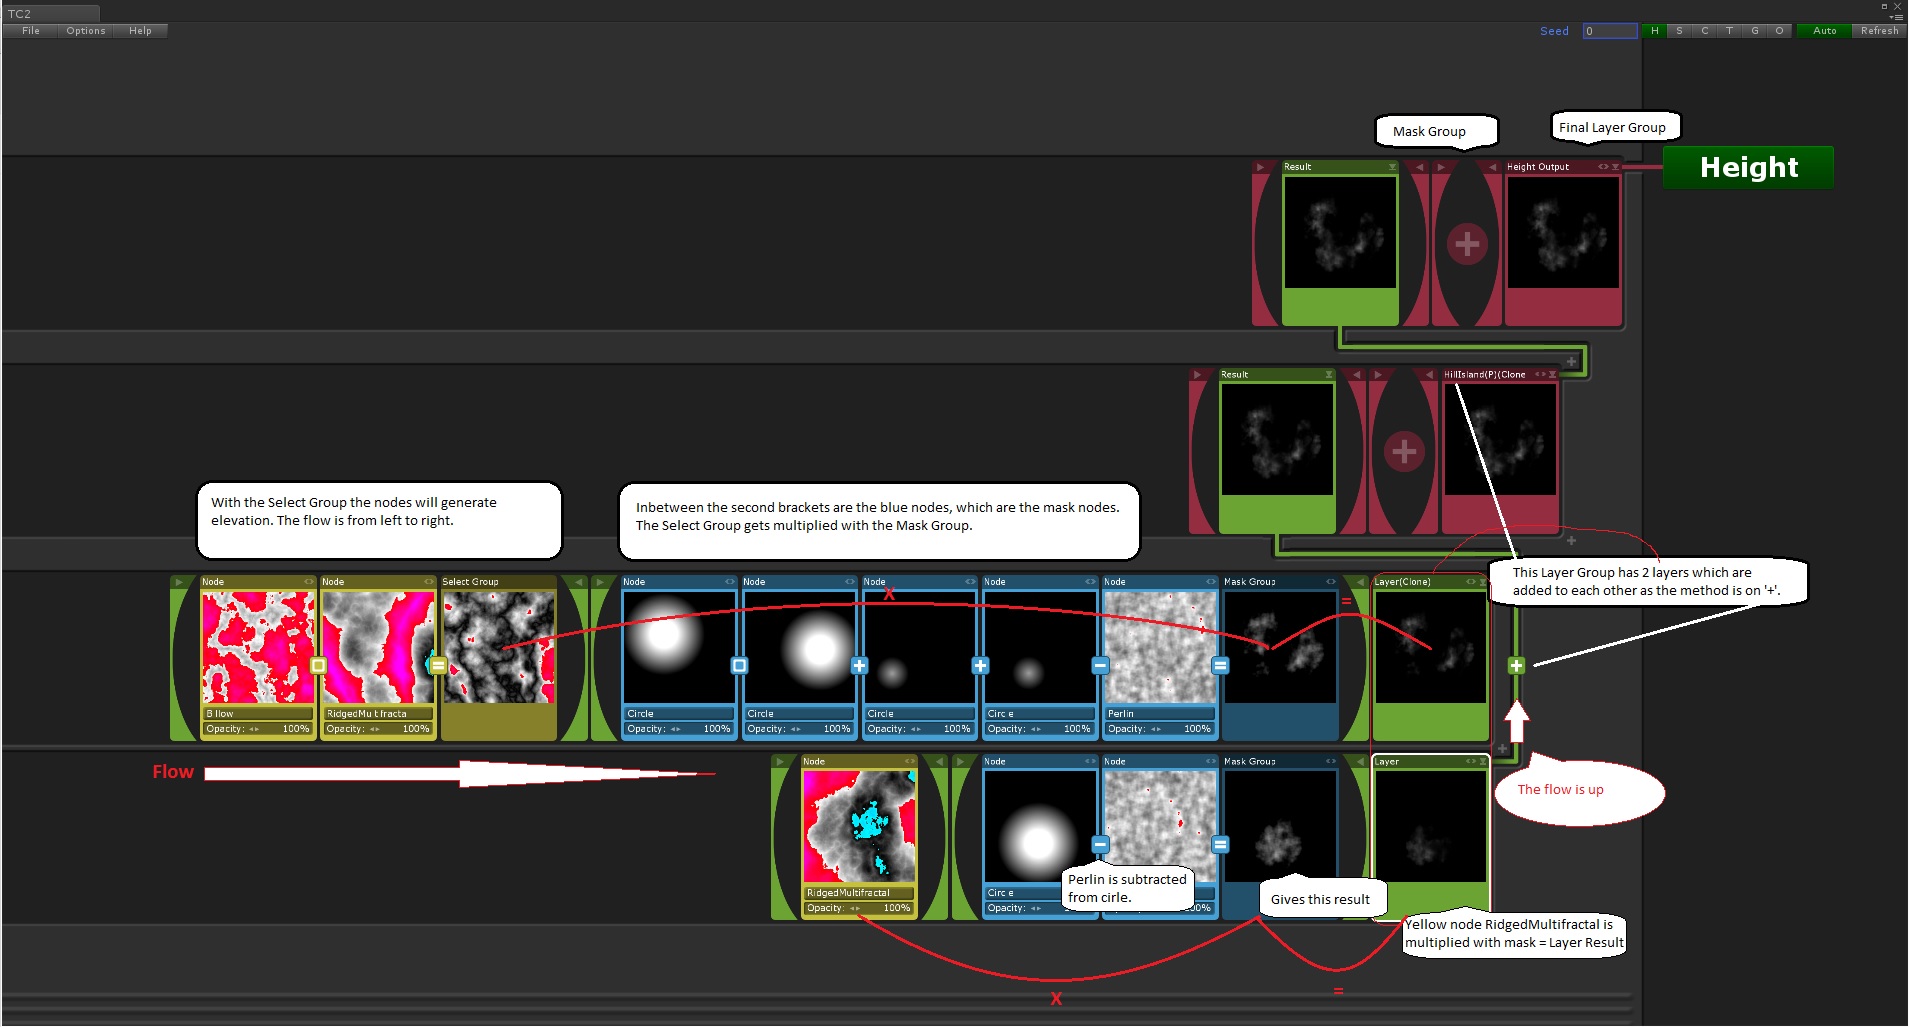
Layer
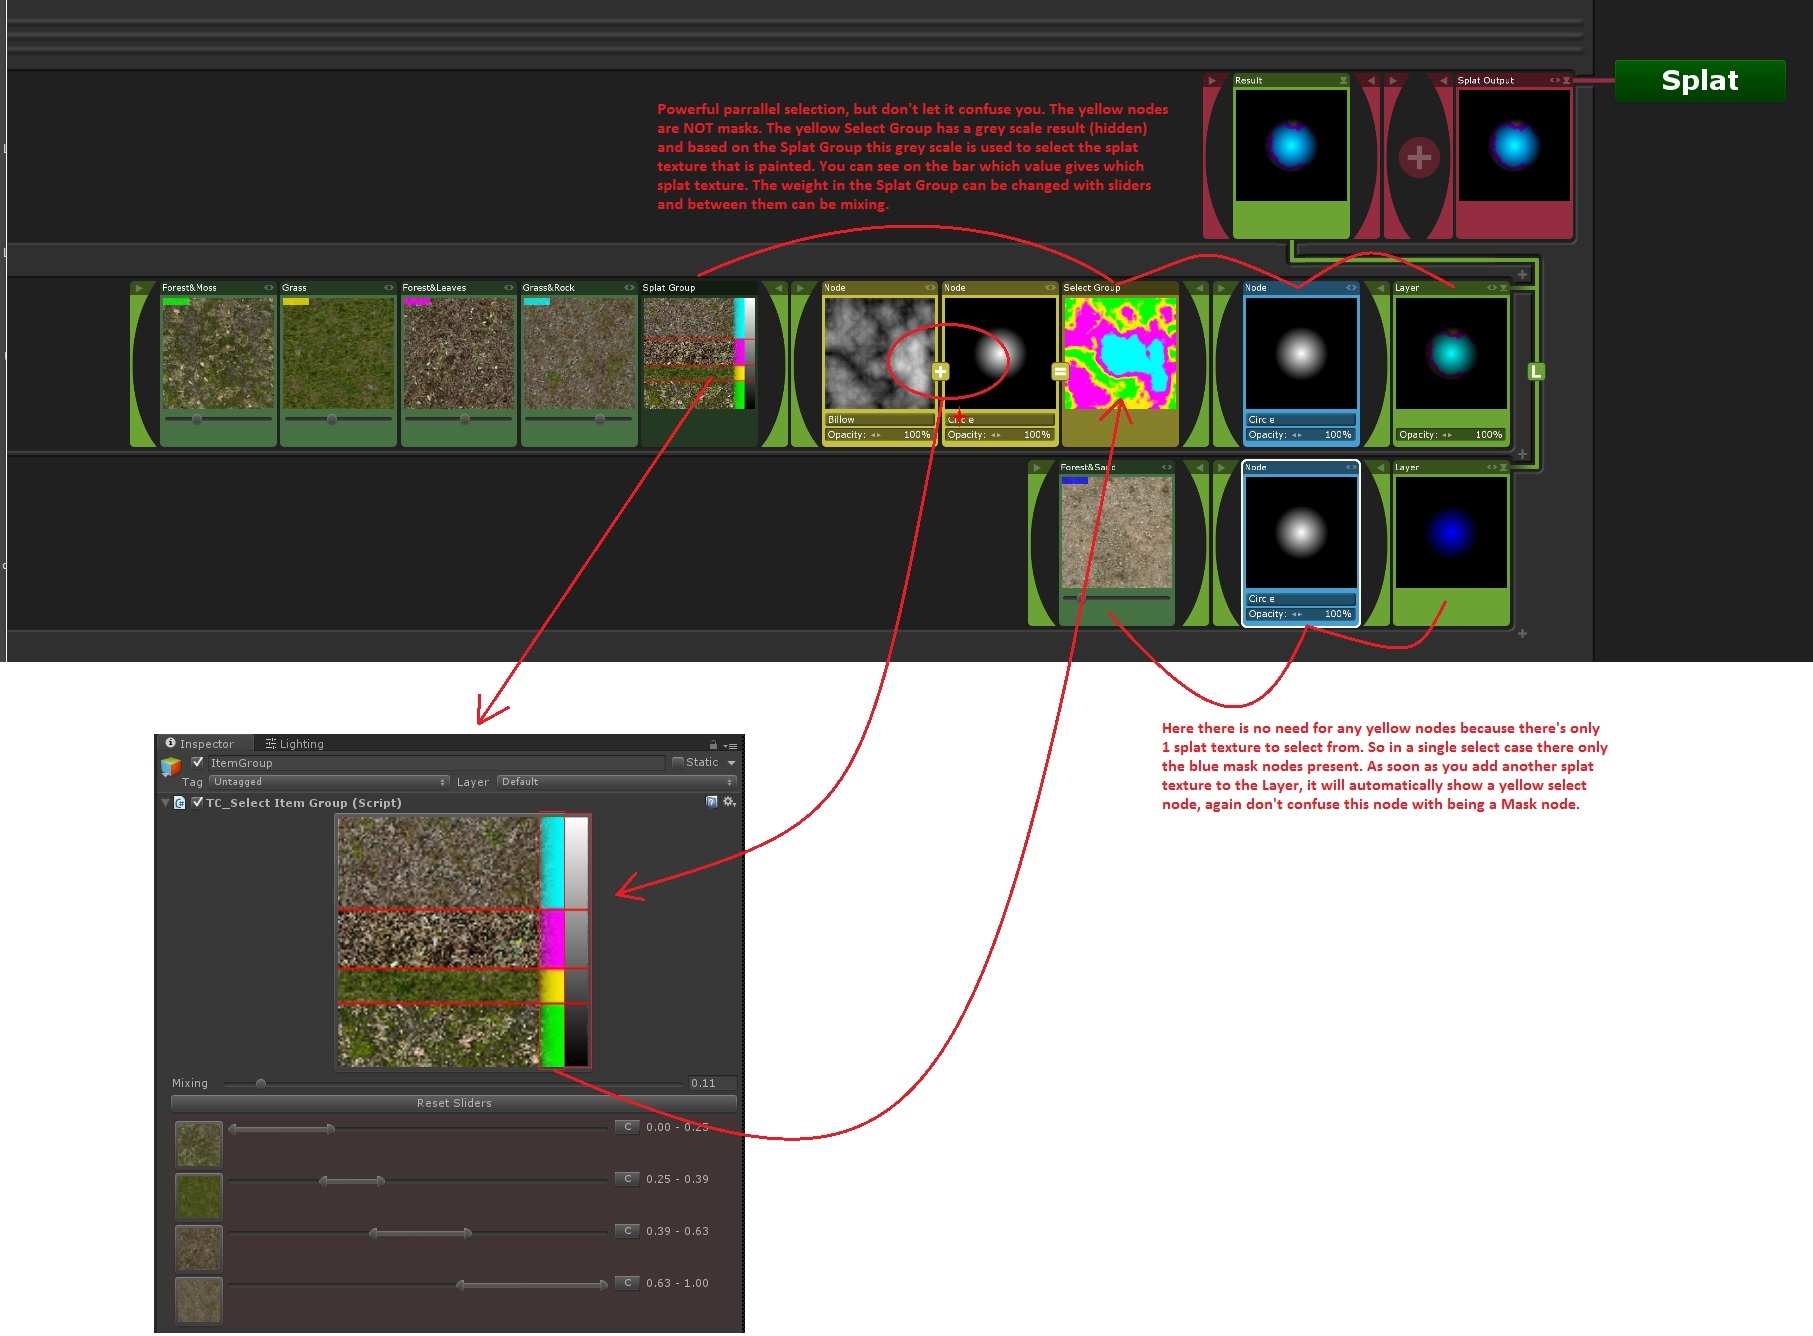
For the ‘Height Output’ a Layer contains a ‘Select Node Group’ (yellow color) and ‘Mask Node Group’ (blue color). A select node generates an elevation and this is multiplied with the mask result (if present). This then is the result of the Layer. This can be seen on the second image in Quick Start. On the other outputs there is one more group. This group contains the items that can be placed. E.g. for Splat output it are the splat textures assigned to a terrain, for Grass output the grass textures that are assigned to a terrain. This parallel select system works the same for all outputs (except for Height which doesn’t have the Item Group to select from). TC2 supports both ‘parallel selection + masking’ and ‘single selection + masking’. If a layer has just 1 item to select from it will leave out the yellow nodes as they are not needed (Most terrain tools work this way). You can get parallel selection as well vertically if you group the Layers in a Layer Group that has been masked.
4.1.How nodes are processed
How nodes are processed is pretty much the same how image effects are processed in Unity. You can stack different image effects on top of each other. Each effect creates a result that is taken as input in the next image effect. This is also how the nodes work horizontally and vertically (layer and layer groups). So each node gives a result and in the next node this result is taken as input. E.g:
- Node1 -> 2
- Node2 -> 1, with method ‘Min’
- Node3 -> 3, with method ‘Add’
- Node4 -> 3.5, with method ‘Max’
It’s processed like this:
- 2
- Min(2,1) = 1
- 1 + 3 = 4
- Max(4, 3.5) = 4
So the result value in the Group Node will be 4.
4.2.Node Blending Options
There are 9 blending options of how nodes/layer nodes/layer group nodes interact with each other:
Add
result = node1 + node0
Subtract
result = node1 – node0
Lerp
result = lerp(node0, node1, opacity value)
Multiply
result = node1 * node0
Divide
result = node0 / node1
Difference
result = abs(node1 – node0)
Average
result = (node1 + node0) / 2
Min
The 2 nodes are compared and the smallest value for the result is chosen.
result = node0 < node1 ? node0 : node1
Max
The 2 nodes are compared and the highest value for the result is chosen.
result = node0 > node1 ? node0 : node1
4.3.Node Settings
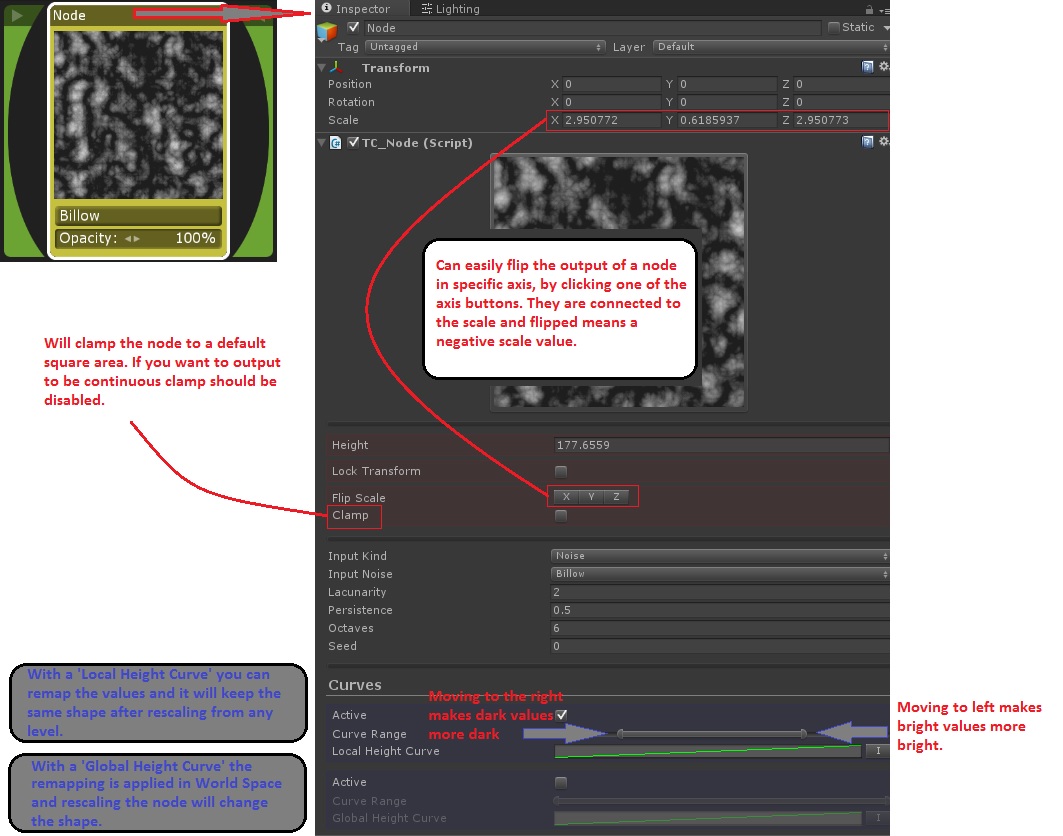
Each node has its own settings with some adjustable on the node itself but most settings are displayed in the Unity’s Inspector window. In the Mask Group and Select Group the nodes have 2 curves. These curves can be used to remap the output of the node. There are 2 height curves a local and a global. The min max slider will clamp the output value between the min and max value. Then in-between this range the curve is applied, so curve position 0 starts at the min slider value and curve position 1 will start at the max slider value. With the min max slider is many cases is already sufficient to remap the node output, unless you want a non linear remap which requires to use the curve.
4.4.Node Types
There is already a wide range of node types and more will be added over time. With combining these nodes in a specific way the possibilities are already very powerful and endless. If you have ideas about new node types, let me know. Node inputs are divided into the following categories:
Terrain
- Height -> Reads the terrain height. E.g. limit vegetation not be placed above a certain height.
- Angle -> Reads the terrain angle. E.g. limit vegetation not to be placed on steep angles.
- Normal -> Reads the terrain normal. E.g. limit vegetation not be placed on steep angles directional x or z axis.
- Splatmap -> Reads the terrain splatmap. E.g. only place vegetation on green splat textures.
- Collision -> Detects mesh geometry on the terrain. Detection can be fine tuned per node by specifying the Layers (GameObject Layers, next to tags…) to include which meshes. E.g. flatten the heightmap under a building or exclude trees, grass or objects being placed inside a building/road. Or do special splat texturing around a building/road.
Noise
Noises respond to the Global ‘Seed’ in the right top of TC2 window. Each noise can be animated with its seed settings on the node itself.
- Perlin -> Creates 3d perlin noise.
- Ridged -> Creates 3d ridged multifractal noise.
- Billow -> Creates 3d billow noise.
- Cell -> Creates 3d cell (voronoi) noise.
- IQ -> Creates 3d iq noise.
- Swiss -> Creates 3d swiss noise.
- Jordan -> Creates 3d jordan noise.
- Random -> Creates random values.
Shape
The shapes are mathematical (not stamps).
- Circle -> Creates a circle with adjustable size and fall-off.
- Gradient -> Creates a gradient with adjustable fall-off.
- Rectangle -> Creates a rectangle that with adjustable x and z size and fall-off. E.g. this is great to make terrain edges flat for the use with Horizon[On] terrain.
- Constant -> A constant value.
File
- Image -> Reads color range from an image. E.g. can be used to place vegetation or buildings based on certain colors in an image.
- Raw Image -> Reads data from a 16 bit raw file. This format is used for the stamps.
Current
The name current refers to the result at the moment you place this node. E.g. in a Node Group if there’s 4 nodes and last node has input on Current: |1 Node|+|5 Node|-|2 Node| |4 Current Node| -> 1 + 5 – 2 = 4. The current node will have the result (in this example 4) of the operations between the previous 3 nodes. Then with this result you can process it through the Current Node to do:
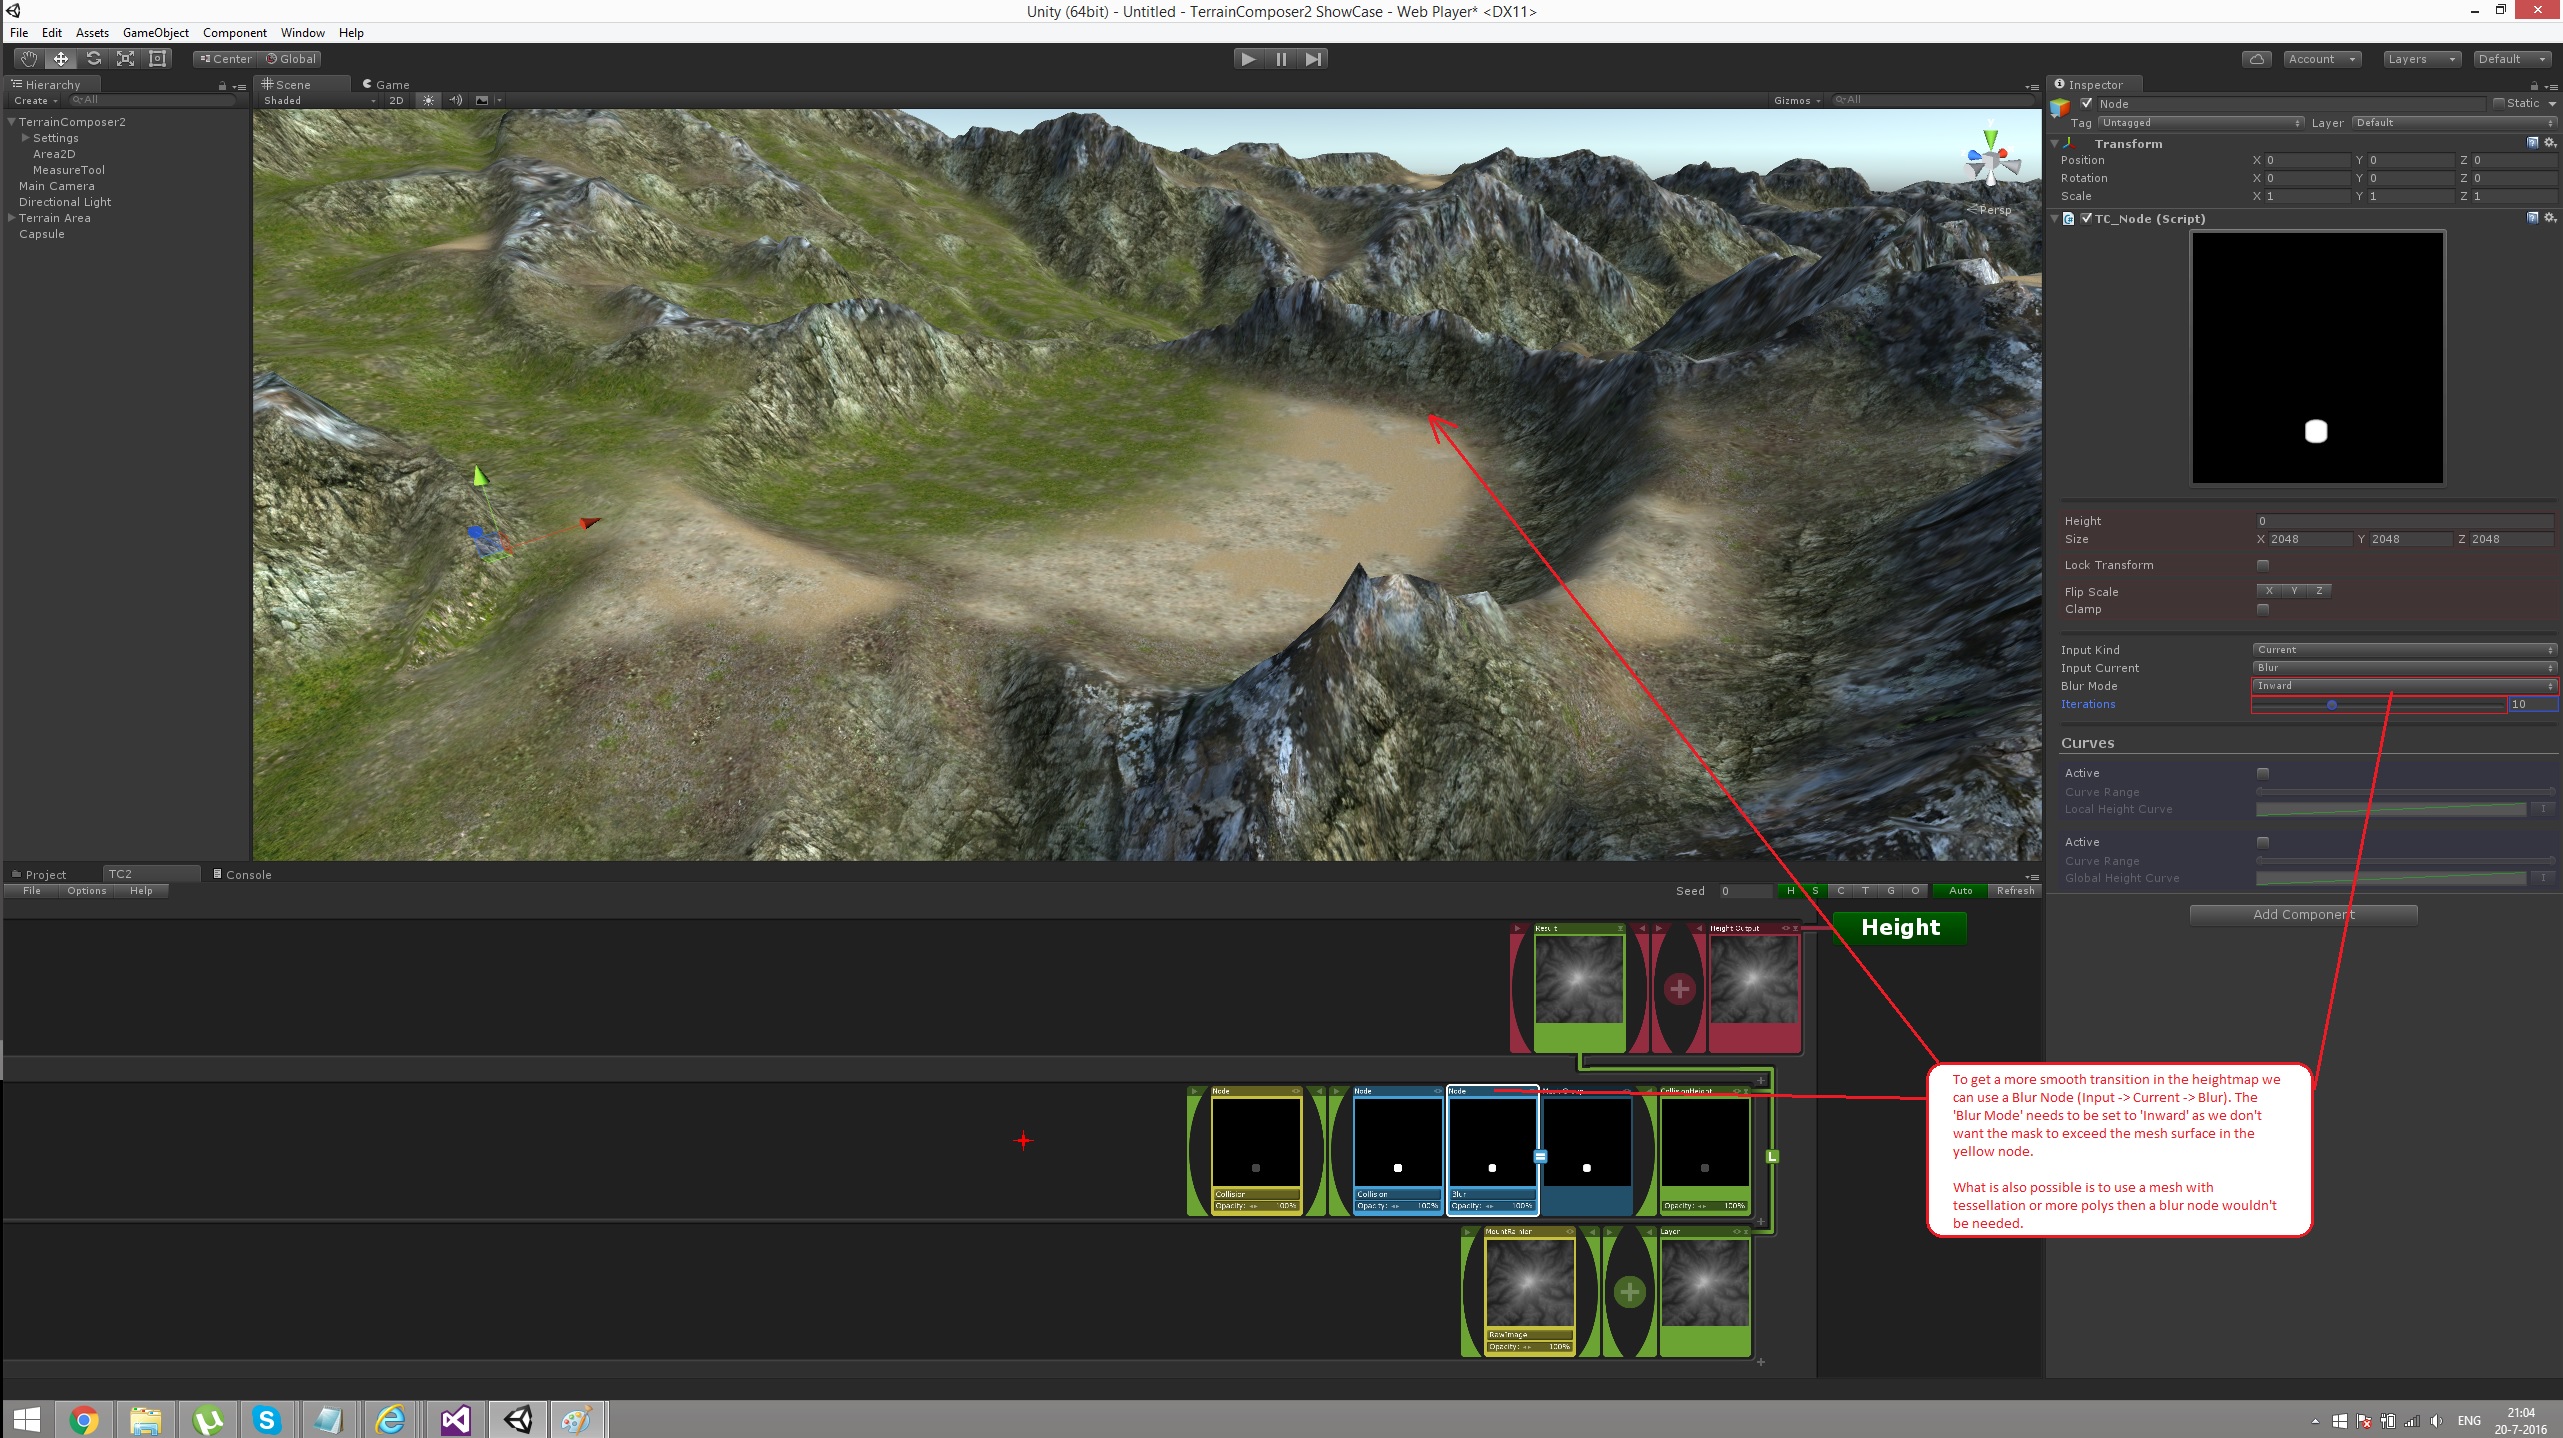
- Blur -> Blur the result. This will make the result look more smooth.
- Expand -> This will make white edges get more wide. E.g. this can be used after the Collision node to make a larger edge around a detected mesh.
- Shrink -> This will make white edges get more small. This is the opposite of Expand.
- Distortion -> This will distort the result. E.g. this can be used to make a shape look less uniform. This effect still needs some work.
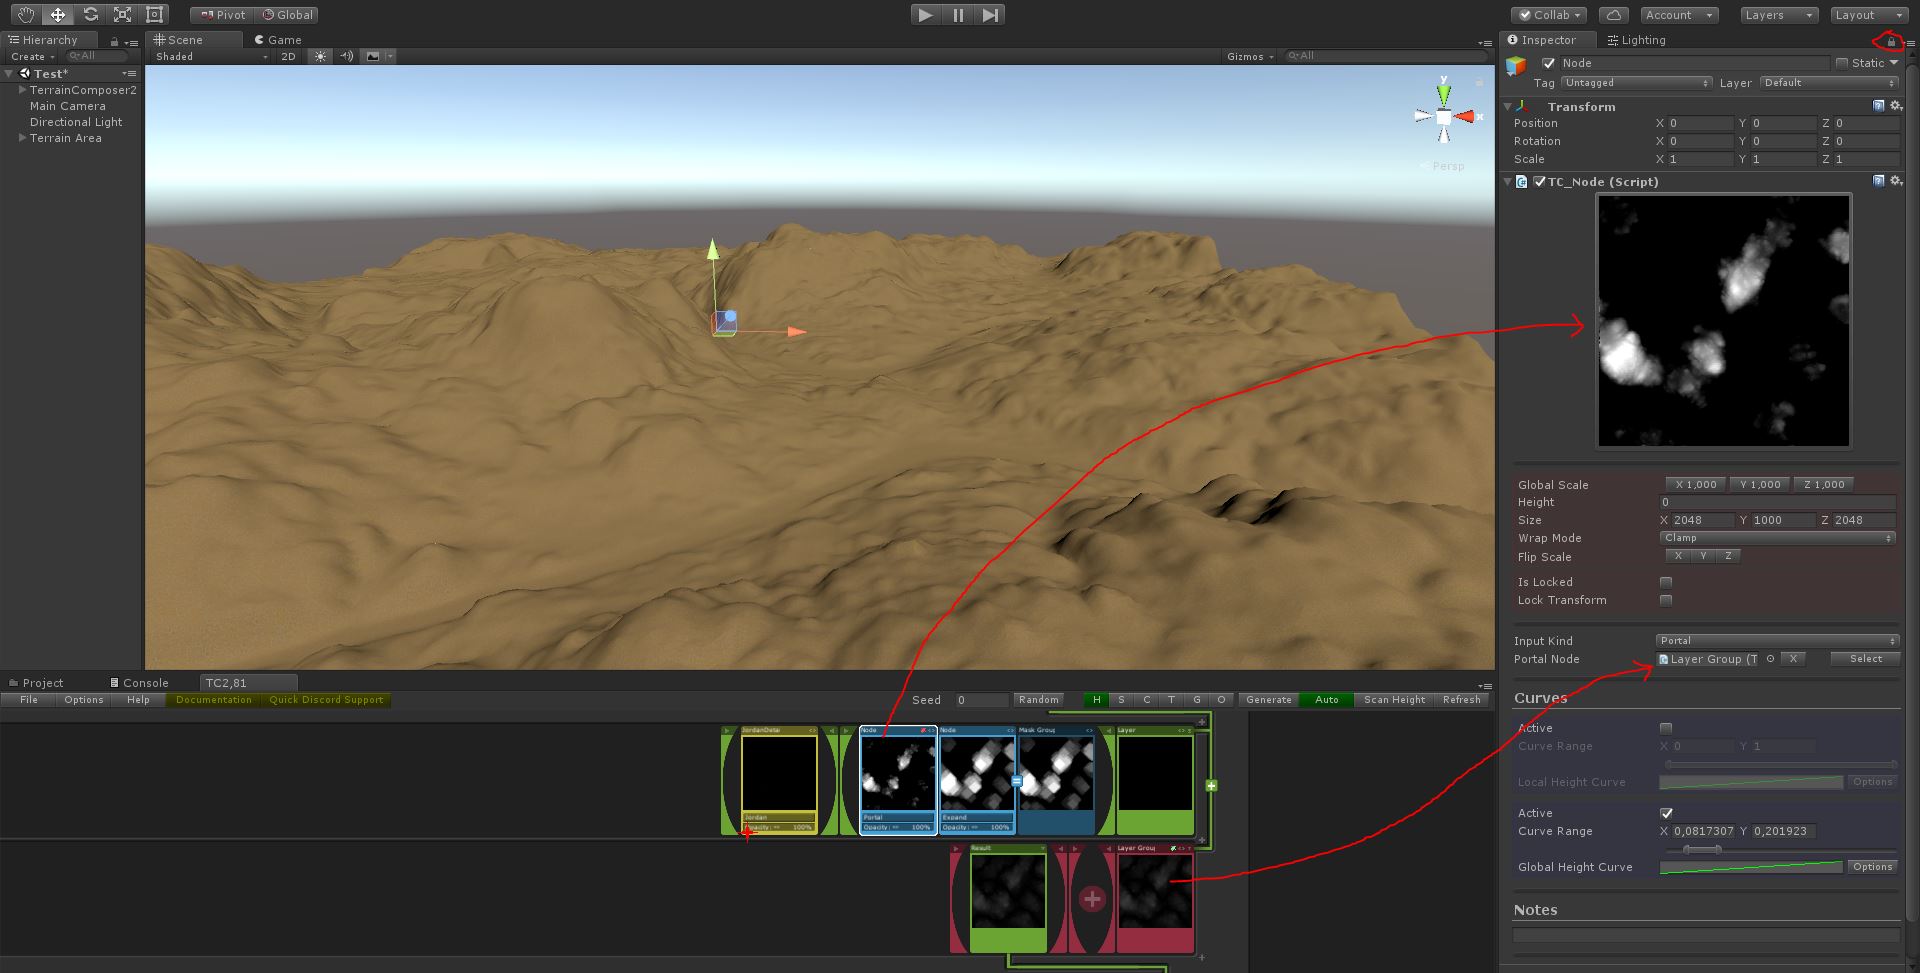
4.5.Portals
Portals can be used to save a current result and later use it somewhere else. This can be handy for reusing the same rules without the need to calculate the same result twice which takes more performance. Nodes, Layers or Layer Groups can be dragged and dropped into a portal. All you need to do is lock the portal in the Inspector (so when selecting the node you want to use doesn’t modify the inspector), and then select the node and drag and drop it Portal node slot. The source node will have a green portal icon, while the portal itself has a red icon. The example below adds detail to the terrain only above a certain height.
5.Generate At Runtime
TC2 can be used at runtime to generate terrains like in the Unity Editor. The TC2 node window is Unity Editor only and won’t be available in runtime, but all the functionality is available. To be able to use TC2 at runtime DirectX11 or Metal is a minimum requirement, as TC2 makes use of Compute Shaders as these have that requirement to be able to run. DX11 is becoming the standard as Unity has already removed their compatibility for DX9.
5.1.How to?
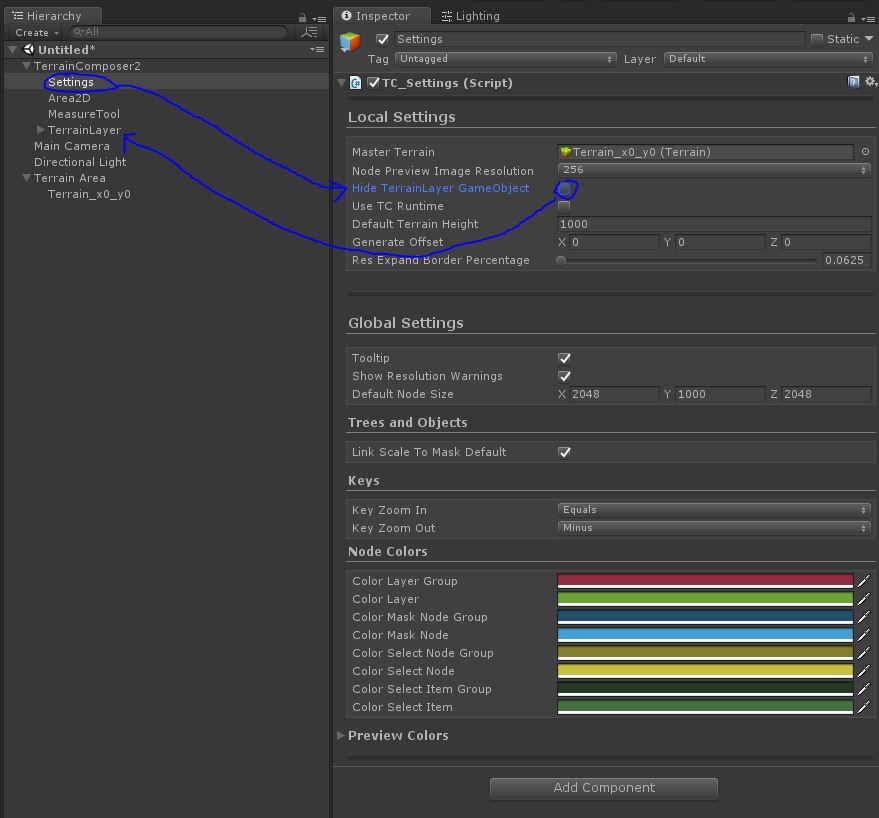
All nodes in TC2 are nothing more than GameObjects with attached scripts parented together in the right order. On default these GameObjects are hidden but you can show them with disabling the ‘Hide TerrainLayer GameObject’ in the Inspector of the Setting GameObject.
Make sure you enable ‘Use TC Runtime’ in the settings otherwise it won’t work.
Also it’s possible to attach any script in the TC2 node window to the nodes or by going inside the TerrainLayer GameObject in the Hiearchy window.
To use any TC2 functionality in any of your C# scripts you need to include TerrainComposer2 namespace in the top of your script with ‘using TerrainComposer2;’
To generate you only need to call:
TC_Generate.instance.Generate(bool instantGenerate, int output);
The output options are:
- TC.heightOutput (generates the heightmap)
- TC.splatOutput (generates the splatmap)
- TC.colorOutput (generates the colormap)
- TC.treeOutput (generates the trees)
- TC.objectOutput (generates the objects)
- TC.allOutput (generates all outputs)
if instantGenerate = false the generate will be scheduled as a task, and only one task will be executed per frame. E.g:
TC_Generate.instance.Generate(false, TC.heightOutput);
TC_Generate.instance.Generate(false, TC.splatOutput);
This will generate the heightmap and the next frame the splatmap, also it will be done for one terrain at the time. InstantGenerate = true, will execute the generate command directly for all terrain in the same frame.
5.2.How to modify nodes by script
Since nodes are just GameObject with MonoBehaviour scripts attached you can use them as any other C# script as you’re used too.
All node scripts inherited from TC_ItemBehaviour and share base fields and methods. To modify any field in a node, you can open the script on it to see which public field you want to modify.
In your own script you can make a reference to the script on the node, and just drag and drop the node from the TC2 window on your node reference in your script (in the Inspector). Also make sure you first lock the Inspector before you click and drag-drop a node from the TC2 window, as selecting a node will show the node Inspector instead if it isn’t locked.
To transform a node you can just use transform.position = …, etc to like you’re used to.
There is a runtime example Scene included in the TerrainComposer2/Examples/Scenes folder. It uses the RuntimeGenerate script.
6.Frequently Asked Questions
Can I rename a node?
Yes this is possible any node type can be renamed by simply selecting it in TC2 window and changing the name in the Inspector. A node is just a GameObject and you can also attach your own scripts to it.
How to delete a node?
Since a node is a GameObject it has the same short key functionality. Select the node in the TC2 window and press the ‘Delete’ key on your keyboard. For Duplicating you can press ‘Control D’.
How to add a Layergroup to a Layergroup.
If Drop the Layer Group on the ‘Result’ node of the Layer Group (if it is empty) you want to add it to. If it already has Layers inside you can just drop the Layer Group under or above the layer.
How can I import a heightmap from WorldMachine?
Export the file in WM as a r16 file. Rename it to raw and drag and drop the raw file into a RawFiles folder in your Unity project. TC2 will automatically create a preview image for it in the folder before it. If it doesn’t make the preview image you can right click the raw file and choose ‘Reimport’. This preview image needs to be drag and dropped on a node (this will put the node automatically to the right input) or you can set the node manually with input on Files -> RawImage. And drag and drop the preview image into the ‘Stamp Texture’ field in the Inspector window.
See more info in the Stamps Chapter.
7.Tips
- If you are working on a certain output e.g. ‘Splat’ then any other output should be disabled as they will update as well even if they didn’t change. E.g. this will allow to put the heightmap resolution of the terrain very high like 2-4k and still get realtime responce when working on splatmaps. If many outputs are active and don’t change then updating the terrain will take more time than needed.
- Terrain heightmap/grass resolution is editable in TC2 with 512 (depending on your hardware, you might need to put it to 256). Splat and Colormap can have higher resolution like 1k-2k. During the workflow you can switch heightmap/grass anytime to high resolutions like 2k, but keep in mind that Unity terrain updating will take a second so real-time terrain editing response is not there anymore. If you want to edit the terrain again you can turn the resolutions down so that the terrain becomes editable again.
8.Trouble Shooting
The ‘+’ button is not visible under the ‘Result’ nodes, so cannot add any Layers. Also weird numbers show in the Inpector when selecting the nodes or TerrainComposer2 related GameObjects.
This happens if ‘Asset Serialization’ is set to ‘Force Text’ in Unity Menu -> Project Settings -> Editor. It is a Unity import bug that can happen on any Asset and TC2 needs to be reimported again (So import it twice). If that does not fix it the ‘Asset Serialization’ can be set to ‘Mixed’ and then reimport TC2 again, then after importing the ‘Asset Serialization’ can be set to ‘Force Text’ again.
Unity crashes when using the Collision Node.
This is an issue on Unity’s side and can happen for objects that are detected with an unusual third party shader. For example on a water shader. The solution is to put such GameObject that uses the shader on a separate Unity layer and don’t add this layer to the collision node.
This issue is encountered on:
Go Ocean Toolkit (I contacted the developer to take a look into this issue).